

This blog is an introduction to Machine Learning (ML) using Amazon SageMaker. Join me on my journey into this field if you’re a beginner to ML and want to understand some of the basic constructs and terminology of Machine Learning. Machine Learning is often used where the computation demands are too high for a human to do. In this blog, I will use a super simple example that allows us to verify the answer from our model. The high-level workflow of machine learning is:
The Machine Learning process starts with data. Our data for this blog is something we can easily visualise, it is a combination of two line equations:
- y = -37 (for the range x is less than 15 – blue line below)
- y = 2x + 7 (for the range x is greater than 15 – red line below)
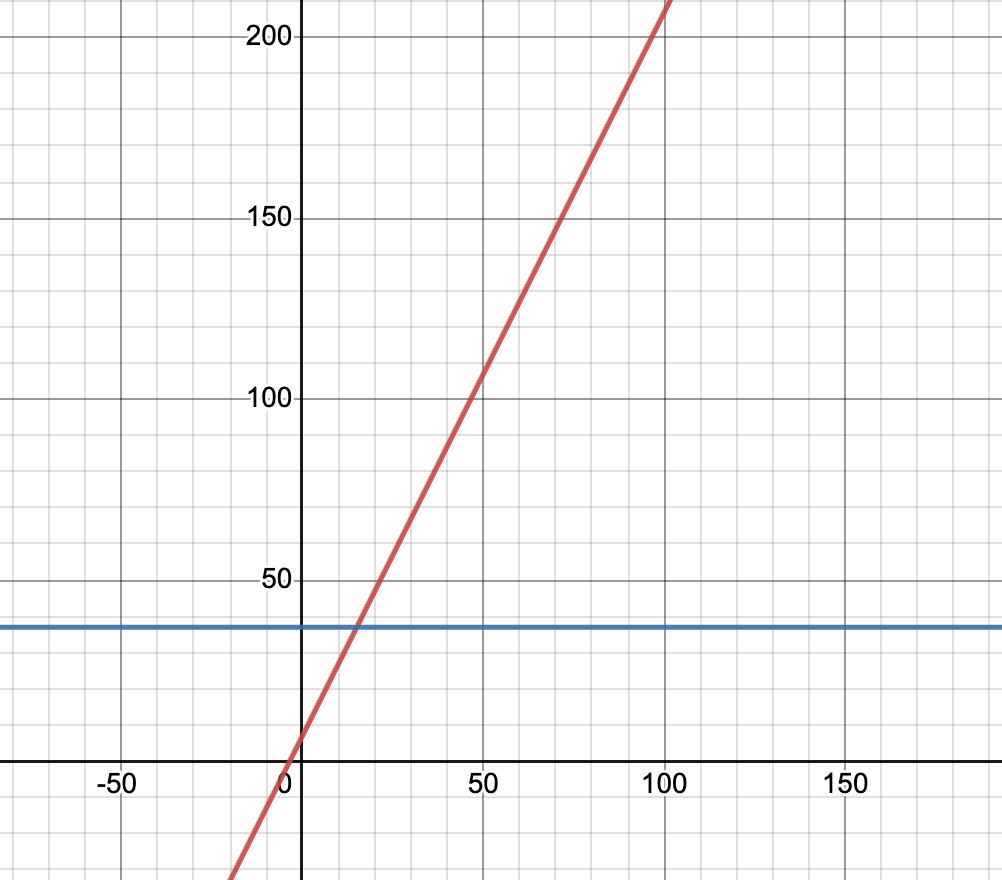
Graph produced from desmos.com
For example, a value of x = 50.5 should result in a prediction of 108 (2 x 50.5 + 7). Note, In this case, x is called a feature. In a typical machine learning process, we would find numerous x features in your input data and you would spend a bit of time cleaning the input data.
I have used the following bash (generate.sh) to create the input data and introduced some randomness similar to what you find in the real world.
#!/bin/bash

# Specify the output file name
output_file="ml_data.csv"

# Print the header to the CSV file
echo "x,y" > "$output_file"

for ((x = 1; x <= 15; x++)); do
    y_original=37

    random_number=$((0 + RANDOM % 100))

    random_variation=$(awk -v min=-5 -v max=5 -v randomvalue="$random_number" 'BEGIN{print min+randomvalue*(max-min)/100}')
    y_with_variation=$(awk -v y="$y_original" -v random="$random_variation" 'BEGIN{printf "%.1f\n", y + random}')

    echo "$x,$y_with_variation" >> "$output_file"
done


# Loop through x values from 15 to 115
for ((x = 15; x <= 115; x++)); do
    y_original=$((2 * x + 7))

    random_number=$((0 + RANDOM % 100))

    random_variation=$(awk -v min=-5 -v max=5 -v randomvalue="$random_number" 'BEGIN{print min+randomvalue*(max-min)/100}')
    y_with_variation=$(awk -v y="$y_original" -v random="$random_variation" 'BEGIN{printf "%.1f\n", y + random}')

    echo "$x,$y_with_variation" >> "$output_file"
done

echo "CSV file generated: $output_file"
We will visualise the randomised data later in the blog when we upload the data into AWS.

A Jupyter Notebook will be used to orchestrate the process. Once the model is created and deployed to an endpoint we will use a Lambda Function to request predictions. If you want to follow along with this tutorial, deploy the code from the Github repository here (https://github.com/arinzl/aws-machine-learning-introduction). The code is separated into two modules:
- Jupyter (Jupyter note and supporting infrastructure)
- Testing ie Useraccess (Lambda function, pipeline to deploy lambda function)
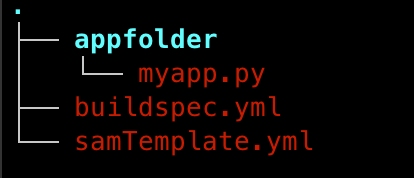
The summary of the files in the GitHub code folder is shown below:
The next phase of the ML process is training. The end result of training is building a model, that we can then request predictions from (ie inference). One of the tools used within AWS for machine learning is Jupyter Notebooks. An introduction to Jupyter Notebooks can be found in an earlier blog post here (https://devbuildit.com/2023/01/24/basic-plotting-using-aws-jupyter-notebooks/). We will be using a Jupyter notebook from within the Amazon SageMaker service. Finally, we will use an Amazon Lambda function to get predictions from our model. An earlier blog on how to create an Amazon Lamba function can be found here (https://devbuildit.com/2023/06/15/aws-lambda-deployment-via-ci-cd-pipeline-and-terraform/) if you need to reintroduce yourselves to the concepts again. If we start to overlay some of these Amazon services into our high-level view we get the following:

appfolder/myapp.py – python application for testing our endpoint
import os
import io
import boto3
import json
import csv

ENDPOINT_NAME = os.environ['ENDPOINT_NAME']
runtime= boto3.client('runtime.sagemaker')

def lambda_handler(event, context):
    print("Received event: " + json.dumps(event, indent=2))

    data = json.loads(json.dumps(event))
    payload = data['data']

    response = runtime.invoke_endpoint(EndpointName=ENDPOINT_NAME,
                                       ContentType='text/csv',
                                       Body=payload)

    result = json.loads(response['Body'].read().decode())

    print("Prediction below:")
    print(result)
main.tf – control deployment of TF modules
module "testing" {
  source = "./modules/useraccess"

  vpc_cidr_range       = var.vpc_cidr_root[terraform.workspace]
  app_name             = var.app_name_root
  region               = var.region_root
  repo_branch          = var.repo_branch_root
  private_subnets_list = var.private_subnets_list_root[terraform.workspace]
  public_subnets_list  = var.public_subnets_list_root[terraform.workspace]
}

module "jupyter" {
  source = "./modules/jupyter"

  depends_on = [module.testing]
  app_name = var.app_name_root
  region   = var.region_root
}
ml-intro.ipynb – Jupyter notebook file for orchestrating the endpoint deployment
variables.tf – variable settings
ariable "app_name_root" {
  description = "Applicaiton Name"
  type        = string
  default     = "ml-intro"
}

variable "vpc_cidr_root" {
  type        = map(string)
  description = "VPC CIDR ranges per terraform workspace"
  default = {
    "default" : "172.17.0.0/20",
    "dev" : "10.32.0.0/16",
  }
}

variable "private_subnets_list_root" {
  description = "Private subnet list for infrastructure"
  type        = map(list(string))
  default = {
    "default" : ["172.17.1.0/24"]
  }
}

variable "public_subnets_list_root" {
  description = "Public subnet list for infrastructure"
  type        = map(list(string))
  default = {
    "default" : ["172.17.15.0/24"]
  }
}

variable "region_root" {
  description = "Applicaiton Name"
  type        = string
  default     = "ap-southeast-2"
}

variable "repo_branch_root" {
  description = "CodeCommit branch name"
  type        = string
  default     = "master"
}
modules/jupyter folder – Jupyter notebook resources
modules/useraccess folder – testing resources
Update the variable value for ‘region’ (and any other variables you want to change) and deploy the terraform code as described in the readme.MD file.
After deploying the Terraform code, we need to deploy our testing Lambda function via our CI-CD pipeline.
Log onto the AWS console and go to the Amazon CodeCommit service. Locate the URL of your deployed Amazon Codecommit repository.

Clone the Codecommit repository (it will be blank and you may encounter a warning for this reason) and create a new branch named ‘master’ and add the following files:
appfolder/myapp.py – file from Github repository
buildspec.yml – file generated during previous Terraform code deployment
samTemplate.yml – file generated during previous Terraform code deployment
Push the three files into the Amazon CodeCommit repository which will automatically kick off a multi-stage pipeline. Note that you may have to create an AWS User in your AWS account and get some credentials to allow access to the Amazon CodeCommit repo.
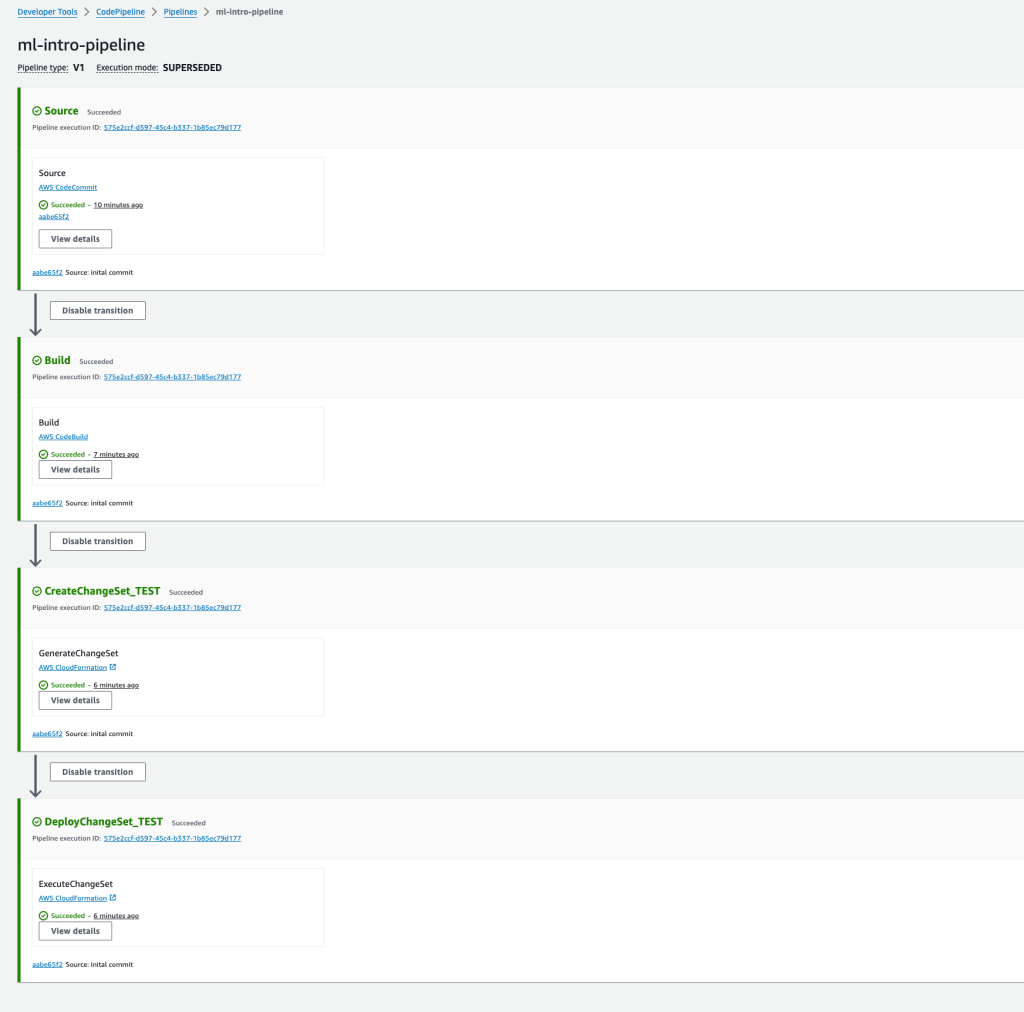
The final stage of the above pipeline will deploy the Lambda function via Cloudfomation.

We return back to Lambda for testing later in the tutorial.
The final step in our preparation is to upload the data (file ml-data.csv) into the deployed S3 bucket, this should be called ‘ml-intro-sagemaker-‘ followed by your AWS accountID. You can do this via the console or by using an AWS CLI command. Note, if you deployed the SageMaker bucket, it will be named something like ml-intro-sagemaker-<your AWS AccountID>. The command to upload our data is:
aws s3 cp ./ml-data.csv s3://ml-intro-sagemaker-<AWS AccountID>/
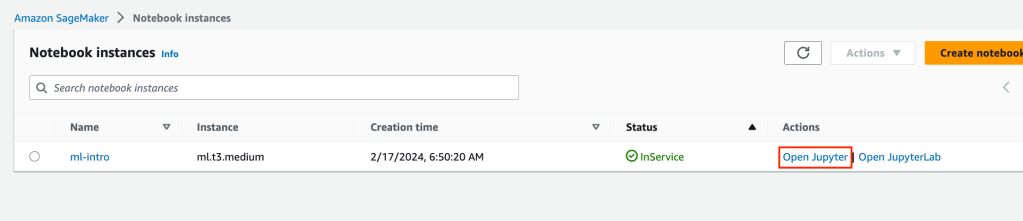
Now that we have all the support infrastructure and testing infrastructure in place, we can start the machine learning training process. Open the Amazon SageMaker service in the console. Navigate to the Notebooks > Notebook Instances and click “Open Jupyter”.
When your Jupyter notebook instance opens up, click on the upload button and upload the file ML-intro.ipynb.

We will execute each code block by clicking inside each code block and then pressing Ctl-Enter. Any relevant responses are shown in boxes with a grey background.
The following code block loads in some dependencies of the modules we call later. Restart your kernel via the menus if requested to do so.
!pip install --upgrade numexpr
!pip install --upgrade pandas
The next code block loads some modules required for later use. Note we will use the XGBoost Algorithm in this example.
import boto3
import sagemaker
import os
from sagemaker import image_uris
from sagemaker.xgboost.estimator import XGBoost
from sagemaker.session import Session
from sagemaker.inputs import TrainingInput
We will set a variable for our S3 bucket location containing our data input. We will also confirm our region.
bucket_name = 'ml-intro-sagemaker-<AWS AccountID' # <--- CHANGE THIS VARIABLE TO A UNIQUE NAME FOR YOUR BUCKET
my_region = boto3.session.Session().region_name # set the region of the instance
print(my_region)
Output region (your region output is likely to be different to mine).
ap-southeast-2Set up the output prefix for model files.
s3 = boto3.resource('s3')
prefix = 'xgboost-algo'
output_path ='s3://{}/{}/output'.format(bucket_name, prefix)
print(output_path)
s3://ml-intro-sagemaker-<AWS AccountID>/xgboost-algo/outputLoad some more modules.
import pandas as pd
import numpy as np
from matplotlib import pyplot as plt
Load in our data as a Pandas dataframe.
model_data = pd.read_csv('s3://ml-intro-sagemaker-<AWS AccountID>/ml_data.csv', sep=',')
We should check the Pandas dataframe content. This is where we normally conduct a lot of data cleansing. However, our data is in good shape since we generated it and does not need any data wrangling or cleansing.
x y
0 1 33.2
1 2 40.2
2 3 32.0
3 4 35.6
4 5 40.0
… … …
111 111 230.9
112 112 232.6
113 113 228.6
114 114 238.3
115 115 240.2
116 rows x columns
Plot the dataframe.
plt.plot(model_data['x'], model_data['y'])
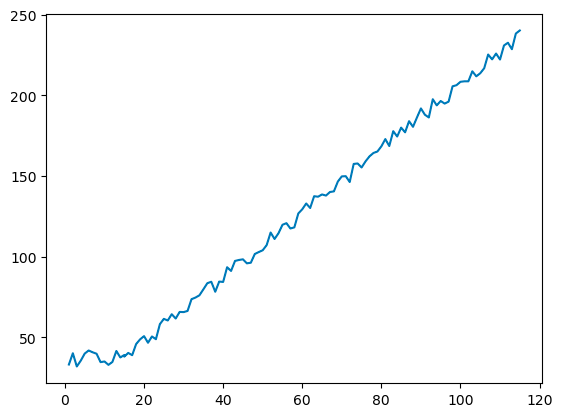
The graph shown immediately above looks similar in principle to the graph generated by desmos.com earlier.
As we are predicting a value, we will be choosing a Linear Regression model. For Linear Regression training, we need to get the value we want to predict (also known as target value) as the first column followed by columns of x attributes (eg Y, x1, x2, x3, x4, x5….).
model_data=model_data[['y','x']]
As we only have a dataset with 116 records, we need to keep a portion for training and a portion for testing the model afterwards. We will take 70% of the data for training purposes and 30% of the data will be used for testing our model. To reduce any bias, we can’t just take the first 70% of records for training purposes, we need a randomised sample.
print(model_data.shape)

import numpy as np
train_data, test_data = np.split(model_data.sample(frac=1, random_state=1729), [int(0.7 * len(model_data))])
print(train_data.shape, test_data.shape)
(116, 2)
(81, 2) (35, 2)
Inspect the test data to confirm; we have column y first and the order is random.
test_data
	y	x
4	40.0	5
64	137.2	64
68	140.5	68
113	228.6	113
87	184.0	87
3	35.6	4
106	216.8	106
30	65.7	30
53	111.0	53
42	91.2	42
0	33.2	1
100	208.4	100
26	60.5	26
12	41.6	13
76	159.1	76
51	107.2	51
19	48.8	19
44	98.0	44
86	177.1	86
43	97.4	43
83	177.8	83
93	197.6	93
73	157.5	73
36	83.6	36
91	188.0	91
65	138.6	65
35	79.8	35
59	126.8	59
89	186.3	89
115	240.2	115
67	140.1	67
21	46.7	21
37	84.5	37
102	208.7	102
13	37.6	14
Create CSV files with training data in our S3 bucket.
train_data.to_csv('train.csv', index=False, header=False)
boto3.Session().resource('s3').Bucket(bucket_name).Object(os.path.join(prefix, 'train/train.csv')).upload_file('train.csv')
s3_input_train = sagemaker.TrainingInput(s3_data='s3://{}/{}/train'.format(bucket_name, prefix), content_type='csv')
Create a CSV file with testing data in our S3 bucket.
test_data.to_csv('test.csv', index=False, header=False)
boto3.Session().resource('s3').Bucket(bucket_name).Object(os.path.join(prefix, 'test/test.csv')).upload_file('test.csv')
s3_input_test = sagemaker.TrainingInput(s3_data='s3://{}/{}/train'.format(bucket_name, prefix), content_type='csv')
Select Container with Algorthim and confirm version. #TODO link algorithm versions
container = image_uris.retrieve("xgboost", my_region, "1.7-1")
container
'783357654285.dkr.ecr.ap-southeast-2.amazonaws.com/sagemaker-xgboost:1.7-1'Each Algorithm can be adjusted with ‘Hyper parameters’. Details of the XGBoost hyper parameters can be found at https://docs.aws.amazon.com/sagemaker/latest/dg/xgboost_hyperparameters.html) Setup a hyperparameters variable:
hyperparameters = {
        "max_depth":"5",
        "eta":"0.2",
        "gamma":"4",
        "min_child_weight":"6",
        "subsample":"0.7",
        "objective":"reg:squarederror",
        "num_round":50
        }
Setup training job/estimator parameters.
estimator = sagemaker.estimator.Estimator(image_uri=container,
                                          hyperparameters=hyperparameters,
                                          role=sagemaker.get_execution_role(),
                                          instance_count=1,
                                          instance_type='ml.m5.2xlarge',
                                          volume_size=5, # 5 GB,
                                          output_path=output_path,
                                          use_spot_instances=True,
                                          max_run=300,
                                          max_wait=600)
Start training (or fit in ML language). Notice how Amazon SageMaker iterates and measures the error/loss and that this reduces over time. Sagemaker will output the model to our S3 bucket.
estimator.fit({'train': s3_input_train,'validation': s3_input_test})
2024-02-17 07:43:48 Starting - Starting the training job...
2024-02-17 07:44:03 Starting - Preparing the instances for training......
2024-02-17 07:45:13 Downloading - Downloading input data...
2024-02-17 07:45:43 Downloading - Downloading the training image......
2024-02-17 07:46:29 Training - Training image download completed. Training in progress...[2024-02-17 07:46:50.995 ip-10-0-115-94.ap-southeast-2.compute.internal:7 INFO utils.py:28] RULE_JOB_STOP_SIGNAL_FILENAME: None
[2024-02-17 07:46:51.017 ip-10-0-115-94.ap-southeast-2.compute.internal:7 INFO profiler_config_parser.py:111] User has disabled profiler.
[2024-02-17:07:46:51:INFO] Imported framework sagemaker_xgboost_container.training
[2024-02-17:07:46:51:INFO] Failed to parse hyperparameter objective value reg:squarederror to Json.
Returning the value itself
[2024-02-17:07:46:51:INFO] No GPUs detected (normal if no gpus installed)
[2024-02-17:07:46:51:INFO] Running XGBoost Sagemaker in algorithm mode
[2024-02-17:07:46:51:WARNING] Suspected identical files found. (/opt/ml/input/data/train/train.csv and /opt/ml/input/data/validation/train.csvwith same size 701 bytes). Note: Duplicate data in the training set and validation set is usually not intentional and can impair the validity of the model evaluation by the validation score.
[2024-02-17:07:46:51:INFO] Determined 0 GPU(s) available on the instance.
[2024-02-17:07:46:51:INFO] Determined delimiter of CSV input is ','
[2024-02-17:07:46:51:INFO] Determined delimiter of CSV input is ','
[2024-02-17:07:46:51:INFO] File path /opt/ml/input/data/train of input files
[2024-02-17:07:46:51:INFO] Making smlinks from folder /opt/ml/input/data/train to folder /tmp/sagemaker_xgboost_input_data
[2024-02-17:07:46:51:INFO] creating symlink between Path /opt/ml/input/data/train/train.csv and destination /tmp/sagemaker_xgboost_input_data/train.csv-514995539248963663
[2024-02-17:07:46:51:INFO] files path: /tmp/sagemaker_xgboost_input_data
[2024-02-17:07:46:51:INFO] Determined delimiter of CSV input is ','
[2024-02-17:07:46:51:INFO] File path /opt/ml/input/data/validation of input files
[2024-02-17:07:46:51:INFO] Making smlinks from folder /opt/ml/input/data/validation to folder /tmp/sagemaker_xgboost_input_data
[2024-02-17:07:46:51:INFO] creating symlink between Path /opt/ml/input/data/validation/train.csv and destination /tmp/sagemaker_xgboost_input_data/train.csv614410478323321983
[2024-02-17:07:46:51:INFO] files path: /tmp/sagemaker_xgboost_input_data
[2024-02-17:07:46:51:INFO] Determined delimiter of CSV input is ','
[2024-02-17:07:46:51:INFO] Single node training.
[2024-02-17:07:46:51:INFO] Train matrix has 81 rows and 1 columns
[2024-02-17:07:46:51:INFO] Validation matrix has 81 rows
[2024-02-17 07:46:51.442 ip-10-0-115-94.ap-southeast-2.compute.internal:7 INFO json_config.py:92] Creating hook from json_config at /opt/ml/input/config/debughookconfig.json.
[2024-02-17 07:46:51.442 ip-10-0-115-94.ap-southeast-2.compute.internal:7 INFO hook.py:206] tensorboard_dir has not been set for the hook. SMDebug will not be exporting tensorboard summaries.
[2024-02-17 07:46:51.443 ip-10-0-115-94.ap-southeast-2.compute.internal:7 INFO hook.py:259] Saving to /opt/ml/output/tensors
[2024-02-17 07:46:51.443 ip-10-0-115-94.ap-southeast-2.compute.internal:7 INFO state_store.py:77] The checkpoint config file /opt/ml/input/config/checkpointconfig.json does not exist.
[2024-02-17:07:46:51:INFO] Debug hook created from config
[0]#011train-rmse:113.45095#011validation-rmse:113.45095
[2024-02-17 07:46:51.470 ip-10-0-115-94.ap-southeast-2.compute.internal:7 INFO hook.py:427] Monitoring the collections: metrics
[2024-02-17 07:46:51.472 ip-10-0-115-94.ap-southeast-2.compute.internal:7 INFO hook.py:491] Hook is writing from the hook with pid: 7
[1]#011train-rmse:91.79003#011validation-rmse:91.79003
[2]#011train-rmse:74.84956#011validation-rmse:74.84956
[3]#011train-rmse:60.87467#011validation-rmse:60.87467
[4]#011train-rmse:49.71364#011validation-rmse:49.71364
[5]#011train-rmse:40.79107#011validation-rmse:40.79107
[6]#011train-rmse:33.32762#011validation-rmse:33.32762
[7]#011train-rmse:27.52867#011validation-rmse:27.52867
[8]#011train-rmse:22.80380#011validation-rmse:22.80380
[9]#011train-rmse:18.91080#011validation-rmse:18.91080
[10]#011train-rmse:16.04577#011validation-rmse:16.04577
[11]#011train-rmse:13.42074#011validation-rmse:13.42074
[12]#011train-rmse:11.22860#011validation-rmse:11.22860
[13]#011train-rmse:9.56787#011validation-rmse:9.56787
[14]#011train-rmse:8.07686#011validation-rmse:8.07686
[15]#011train-rmse:7.09246#011validation-rmse:7.09246
[16]#011train-rmse:6.07379#011validation-rmse:6.07379
[17]#011train-rmse:5.40086#011validation-rmse:5.40086
[18]#011train-rmse:4.77567#011validation-rmse:4.77567
[19]#011train-rmse:4.22924#011validation-rmse:4.22924
[20]#011train-rmse:3.90088#011validation-rmse:3.90088
[21]#011train-rmse:3.58563#011validation-rmse:3.58563
[22]#011train-rmse:3.44960#011validation-rmse:3.44960
[23]#011train-rmse:3.34293#011validation-rmse:3.34293
[24]#011train-rmse:3.28794#011validation-rmse:3.28794
[25]#011train-rmse:3.23841#011validation-rmse:3.23841
[26]#011train-rmse:3.18865#011validation-rmse:3.18865
[27]#011train-rmse:3.15565#011validation-rmse:3.15565
[28]#011train-rmse:3.13474#011validation-rmse:3.13474
[29]#011train-rmse:3.08520#011validation-rmse:3.08520
[30]#011train-rmse:3.02783#011validation-rmse:3.02783
[31]#011train-rmse:2.98988#011validation-rmse:2.98988
[32]#011train-rmse:2.97752#011validation-rmse:2.97752
[33]#011train-rmse:2.96768#011validation-rmse:2.96768
[34]#011train-rmse:2.94065#011validation-rmse:2.94065
[35]#011train-rmse:2.87961#011validation-rmse:2.87961
[36]#011train-rmse:2.86183#011validation-rmse:2.86183
[37]#011train-rmse:2.85901#011validation-rmse:2.85901
[38]#011train-rmse:2.83630#011validation-rmse:2.83630
[39]#011train-rmse:2.83321#011validation-rmse:2.83321
[40]#011train-rmse:2.79526#011validation-rmse:2.79526
[41]#011train-rmse:2.79117#011validation-rmse:2.79117
[42]#011train-rmse:2.78431#011validation-rmse:2.78431
[43]#011train-rmse:2.77501#011validation-rmse:2.77501
[44]#011train-rmse:2.77440#011validation-rmse:2.77440
[45]#011train-rmse:2.76408#011validation-rmse:2.76408
[46]#011train-rmse:2.75372#011validation-rmse:2.75372
[47]#011train-rmse:2.74233#011validation-rmse:2.74233
[48]#011train-rmse:2.74187#011validation-rmse:2.74187
[49]#011train-rmse:2.73981#011validation-rmse:2.73981

2024-02-17 07:47:10 Uploading - Uploading generated training model
2024-02-17 07:47:10 Completed - Training job completed
Training seconds: 117
Billable seconds: 51
Managed Spot Training savings: 56.4%
Deploy the model.
xgb_predictictor = estimator.deploy(initial_instance_count=1, instance_type='ml.m5.large')
INFO:sagemaker:Creating model with name: sagemaker-xgboost-2024-02-17-07-52-00-868
INFO:sagemaker:Creating endpoint-config with name sagemaker-xgboost-2024-02-17-07-52-00-868
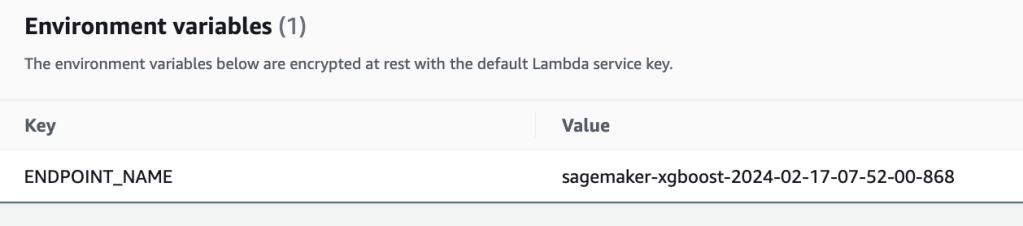
INFO:sagemaker:Creating endpoint with name sagemaker-xgboost-2024-02-17-07-52-00-868To test our model with our Lambda function we need to obtain the model name
xgb_predictictor.endpoint_name
'sagemaker-xgboost-2024-02-17-07-52-00-868'
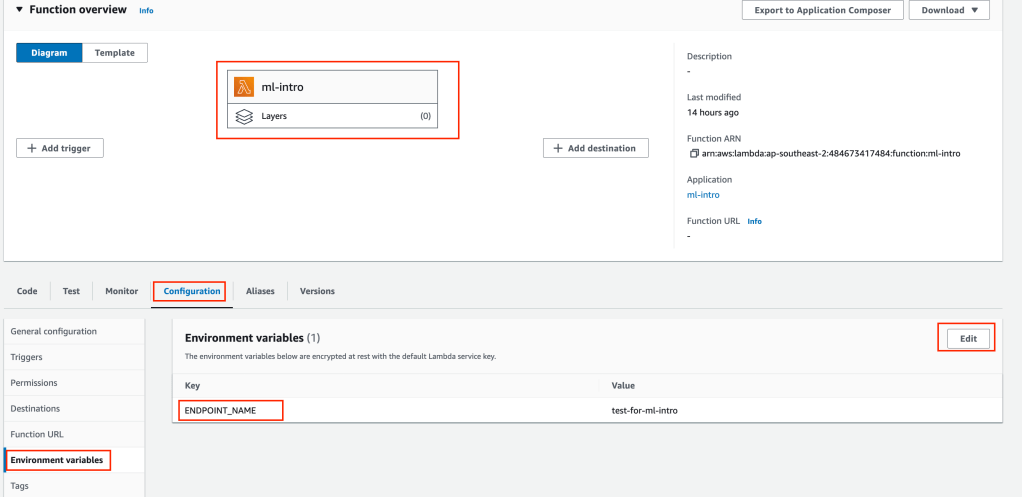
Open the Lambda Service in AWS console and open the Lambda Function ml-intro. Click Configuration > Environment variables and update value for ENDPOINT_NAME with name from our notebook output
We need to create some test data. Remember earlier we calculated a value of 50.5 which should return a prediction near 108 (2 x 50.5 + 7). Click on the Test tab, adjust data input event as shown below.
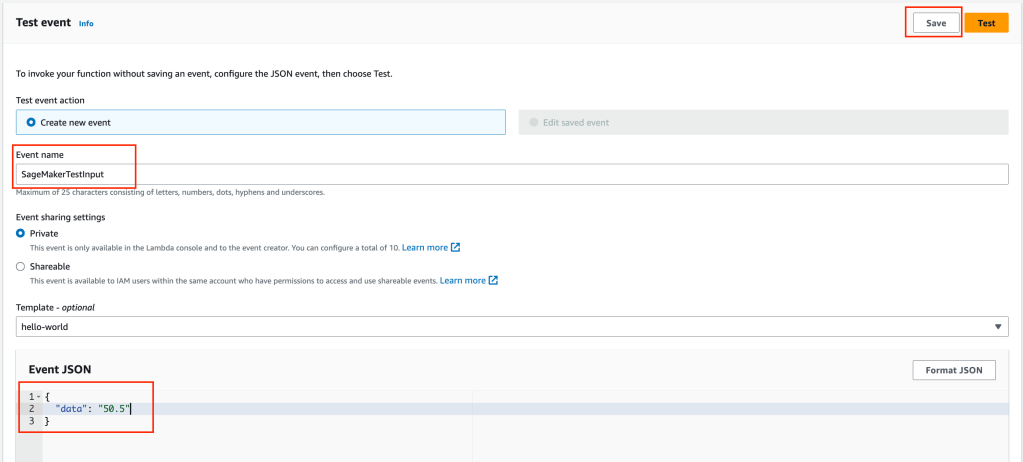
Click on the test button and Lambda will query the endpoint and return results as shown below.
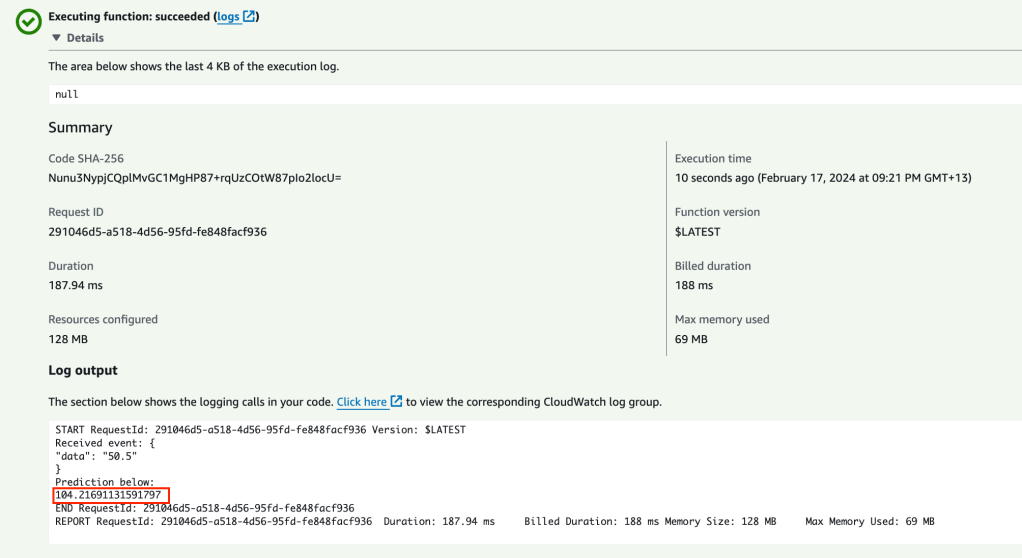
So when the input is 50.5 we expected an output of 108. We got 104.2 – not bad considering our training data (only 85 data points).
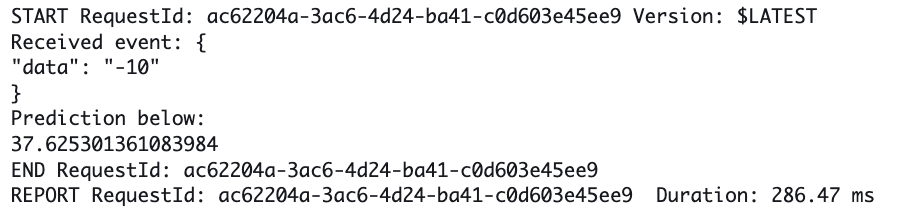
If we request a prediction outside of our dataset input, lets say -10, we should get back 37.
For an input 112.5, we should get an output of approximately 232, we get 226.

These results show an accuracy of approx 96% which is not too bad considering we only had 85 data points to formulate a model.
Once you have completed your tutorial it is important to tidy up everything to avoid some high bills. To tidy up you will need to:
- Delete endpoint via SageMaker > Inference > Endpoints
- Delete CloudFormation Stack
- Empty bucket ml-intro-sagemaker-<AWS AccountID>
- Empty bucket ml-intro-artifact-<AWS AccountID>
- Run terraform destroy on your code
That’s the end of this rather long Machine Learning Introduction tutorial! Hopefully this tutorial has: introduced you to the overall process; introduced you to Machine Learning terminology and shown you an end to end worked example that you can understand.
