

This is the start of a new blog series where we experiment with some Computer Vision tools. We will conduct our experiments using serverless technology. We want to eventually achieve the ability to upload a video to a S3 bucket and have it pass through a Computer Vision model which will provide the object detections. The Computer Vision model will return the original video with objects of interest highlighted with ‘bounding boxes’. We will run our Computer vision model on an AWS Fargate container.
AWS Fargate is a serverless compute engine for containers, that works with Amazon Elastic Container Service (ECS). Fargate allows you to run containers without having to manage the underlying infrastructure, providing a simpler way to deploy and manage containerised applications. As this is a managed service, the compute power is provided by a separate AWS managed account where AWS manages the underlying ECS cluster resources. A network interface is connected from the AWS managed ECS cluster back to your VPC in your AWS account.
We will use AWS Fargate to provide the compute resources to run our computer vision tools. In this blog we will:
- Locally build a Docker image
- Create an AWS Container Registry
- Upload our Docker image to our Container Registry
- Run a Fargate container allowing access to the operating system shell (this will assist you in debugging issues with your container image)
One question I had when starting with container technology was, why do we use containers? The short answer is that we use containers instead of traditional virtual or physical servers because containers provide a lightweight, consistent, and portable environment for applications, enabling faster deployment, better resource utilisation, and easier scalability and management. My next question was why use containers instead of EC2 instances on AWS? We use Fargate containers instead of AWS EC2 instances because containers offer faster deployment, better resource efficiency, and easier scalability by encapsulating applications and their dependencies in a lightweight manner. Fargate also eliminates the need to manage and provision our own ECS EC2 instances, reducing the operational overhead. This makes Fargate a great choice for serverless workloads.
Once I had convinced myself to use Fargate containers I started to experiment. Like most people I used a local docker environment as this is a lower cost playground for experiments. The local environment worked great on my ARM based Macbook. I created a very basic image (see docker file below) and ran a container. I was able to access the shell of my container. The steps are shown below ( I have assumed you have docker installed on your local device).
Creating a Docker image
Dockerfile contents:
# Base image
FROM ubuntu:22.04

# Set environment variables
ENV DEBIAN_FRONTEND=noninteractive
ENV TZ=Pacific/Auckland

# Entry point script
ENTRYPOINT ["tail", "-f", "/dev/null"]
Docker containers start and run the “entry point command”, which starts the process. When the entry point process completes, the container is shutdown. By continually running the tail command the container entry process runs continuously. This allows us to interact with the container via the shell which is really handy when debugging container process issues.
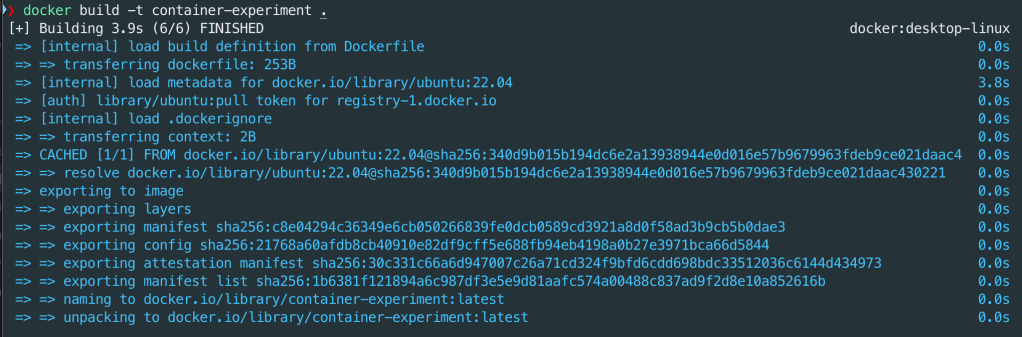
Running the following command ( docker build -t container-experiment .) in the folder with the Dockerfile will create a docker image based on ubuntu 22.04 and name (or tag) it container-experiment.
You can check your images by running command:
docker image ls

Run the Docker container locally
You can run the following command to start the container on your local device. Note, that the container command never completes so it stays running and you loose access to your container from your current command prompt window. Luckily we can use a new command window to interact with the running docker process.
docker run container-experiment
You can check what containers are running using the following command in a new command window:
docker ps -a

Note the Container ID is: 3c5f9defd0c3
From time to time you need to debug your container images. To do this, you attach to the container using the docker exec command such as ‘docker exec -it <container ID> <command>’ . If you run this command, you can access a bash shell and obtain the operating system name using the command parameters below.

Recapping some of the key concepts used so far:
Dockerfile: Details how to build an image
Image: Is a template of what is configured and which process(es) run in a container
Container: Running process(es) based on a Docker image
The next step is repeat the process on a Fargate container. I ran into two challenges with this:
- My laptop is a Silicon based Macbook, so my locally created docker images are ARM based. The default Fargate runtime is Intel based.
- Debugging the container issues via a shell requires some extra steps in Fargate.
For a Silicon based Macbook (ie ARM based device) you need to tell docker to use an ARM based source for the build and when the Fargate container is created in AWS we need to set the container type to be ARM. These settings are implemented in the Dockerfile, ECS task definition. Finally, enabling docker ‘containerd’ on your device creates the docker images. For simplicity, the code used in this blog post will be based on x86 rather than ARM CPU architecture.
Debugging Images via command prompt on Fargate is a bit trickier than local docker. We use the EXEC command via AWS CLI in conjunction with the SSM agent. Luckily the Fargate containers have the SSM agent installed, we just need to assign our task role these additional SSM permissions.
Before looking at the code it is worth while understanding some AWS container concepts.
Task: An instance of a running process(es) as defined in the task definition.
Task definition: a blueprint of what image and process(es) should run, how much resources (cpu, memory, network ports, container image(s) ) assigned to the task, environment variables, etc. Task definition can contain multiple container definitions.
Service: maintains the desired number of tasks to be run simultaneously.
Cluster: Provides a logical collection of services and task. For Fargate the underlying infrastructure required for the cluster is managed by AWS.
Amazon Elastic Container Registry (ECR): An AWS service which provides a convenient place for you to upload docker and other format images privately.

We can deploy code from git hub repository (https://github.com/arinzl/aws-fargate-101/TF) to deploy the following components:
- VPC
- ECR registry
- ECS Cluster
- Task definition
- Container definition
- Cloudwatch log group
Details of the Terraform code are given below:
Cloudwatch logs (file cloudwatch.tf): Create Cloudwatch log groups for ECS Service and ECS Task.
resource "aws_cloudwatch_log_group" "ecs_cluster" {
  name = "${var.name}-demo-ecs-cluster"

  retention_in_days = 7
}

resource "aws_cloudwatch_log_group" "ecs_task" {
  name = "${var.name}-demo-ecs-task"

  retention_in_days = 7
}
Data objects (file data.tf): Create data objects for the current AWS account
data "aws_caller_identity" "current" {}
Elastic Container Registry (file ecr.tf): Container registry for Docker images, enabling scanning on upload.
resource "aws_ecr_repository" "demo" {
  name = "${var.name}-demo"

  image_scanning_configuration {
    scan_on_push = true
  }
}

resource "aws_ecr_registry_scanning_configuration" "configuration" {
  scan_type = "ENHANCED"

  rule {
    scan_frequency = "CONTINUOUS_SCAN"
    repository_filter {
      filter      = "*"
      filter_type = "WILDCARD"
    }
  }
}
Elastic Container Service (file ecs.tf): Create Container components – cluster, service & task definition, container definition (with environment variables).
resource "aws_ecs_cluster" "main" {
  name = "${var.name}-demo-cluster"

  configuration {
    execute_command_configuration {
      logging = "OVERRIDE"
      log_configuration {
        cloud_watch_encryption_enabled = false
        cloud_watch_log_group_name     = aws_cloudwatch_log_group.ecs_cluster.name
      }
    }
  }
}

resource "aws_ecs_task_definition" "main" {
  family                   = "${var.name}-demo-ecs-task-def"
  task_role_arn            = aws_iam_role.ecs_task_role.arn
  execution_role_arn       = aws_iam_role.ecs_task_execution_role.arn
  network_mode             = "awsvpc"
  cpu                      = var.container_cpu
  memory                   = var.container_memory
  requires_compatibilities = ["FARGATE"]
  runtime_platform {
    operating_system_family = "LINUX"
    # cpu_architecture        = "ARM64"
  }

  container_definitions = jsonencode([
    {
      name      = "${var.name}-demo-container"
      image     = "${aws_ecr_repository.demo.repository_url}:latest"
      essential = true
      environment = [
        {
          "name" : "TZ",
          "value" : "Pacific/Auckland"
        },
      ],
      cpu    = var.container_cpu
      memory = var.container_memory
      portMappings = [
        {
          protocol      = "tcp"
          containerPort = var.container_port
          hostPort      = var.container_port
        }
      ]
      mountPoints = []
      volumesFrom = []
      "linuxParameters" : {
        "initProcessEnabled" : true
      }
      logConfiguration = {
        "logDriver" = "awslogs"
        "options" = {
          "awslogs-group"         = aws_cloudwatch_log_group.ecs_task.name,
          "awslogs-stream-prefix" = "ecs",
          "awslogs-region"        = var.region
        }
      }
    }
  ])
}

resource "aws_ecs_service" "main" {

  name                   = "${var.name}-demo-service"
  cluster                = aws_ecs_cluster.main.id
  task_definition        = aws_ecs_task_definition.main.arn
  desired_count          = var.service_desired_count
  launch_type            = "FARGATE"
  enable_execute_command = true

  network_configuration {
    security_groups  = [aws_security_group.ecs_task.id]
    subnets          = module.demo_ecs_vpc.public_subnets
    assign_public_ip = true
  }
}
IAM roles for ECS (file iam.tf): Role for ECS Task and ECS Execution Task.
## Common ##
data "aws_iam_policy_document" "ecs_task_execution_role_assume_policy" {
  statement {
    actions = [
      "sts:AssumeRole"
    ]
    principals {
      type = "Service"
      identifiers = [
        "ecs-tasks.amazonaws.com"
      ]
    }
  }
}

## ECS Task Execution Role ##
resource "aws_iam_role" "ecs_task_execution_role" {
  name = "${var.name}-ecsTaskExecutionRole"
  managed_policy_arns = [
    "arn:aws:iam::aws:policy/service-role/AmazonECSTaskExecutionRolePolicy",
    "arn:aws:iam::aws:policy/AmazonEC2ContainerRegistryReadOnly"
  ]
  assume_role_policy = data.aws_iam_policy_document.ecs_task_execution_role_assume_policy.json
}

resource "aws_iam_role_policy" "ecs_task_execution_policy" {
  name = "${var.name}-ecs-task-execution"
  role = aws_iam_role.ecs_task_execution_role.id

  policy = data.aws_iam_policy_document.ecs_task_execution_policy_document.json
}

data "aws_iam_policy_document" "ecs_task_execution_policy_document" {

  statement {
    sid = "Logs"

    actions = [
      "logs:CreateLogStream",
      "logs:PutLogEvents"
    ]

    resources = [
      "*"
    ]
  }
  statement {
    sid = "EcrContents"

    actions = [
      "ecr:GetAuthorizationToken",
      "ecr:BatchCheckLayerAvailability",
      "ecr:GetDownloadUrlForLayer",
      "ecr:BatchGetImage"
    ]

    resources = [
      "*"
    ]
  }

}

## ECS Task Role ##
resource "aws_iam_role" "ecs_task_role" {
  name = "${var.name}-ecsTaskRole"

  assume_role_policy = data.aws_iam_policy_document.ecs_task_execution_role_assume_policy.json
}

resource "aws_iam_role_policy" "ecs_task_policy" {
  name = "${var.name}-ecs-task"
  role = aws_iam_role.ecs_task_role.id

  policy = data.aws_iam_policy_document.ecs_task_policy_document.json
}

data "aws_iam_policy_document" "ecs_task_policy_document" {

  statement {
    sid = "Logs"

    actions = [
      "logs:CreateLogStream",
      "logs:PutLogEvents"
    ]

    resources = [
      "*"
    ]
  }

  statement {
    sid = "ECSPermissions"

    actions = [
      "ecs:ExecuteCommand",
      "ecs:DescribeTasks"
    ]

    resources = [
      "*"
    ]
  }

  statement {
    sid = "AWSCLIECSExec"

    actions = [
      "ssmmessages:CreateControlChannel",
      "ssmmessages:CreateDataChannel",
      "ssmmessages:OpenControlChannel",
      "ssmmessages:OpenDataChannel"
    ]
    resources = [
      "*"
    ]
  }
}
Terraform Provider (file provider.tf)
provider "aws" {
  region = var.region
}
Security Groups (file security-groups.tf): Security group for tasks.
resource "aws_security_group" "ecs_task" {
  description = "Managed by Terraform"
  name        = "${var.name}-sg-task"
  vpc_id      = module.demo_ecs_vpc.vpc_id

  ingress {
    description = "Allow from private subnets"
    protocol    = "tcp"
    from_port   = var.container_port
    to_port     = var.container_port
    cidr_blocks = ["0.0.0.0/0"]
  }

  egress {
    description = "Allow to all internal destinations"
    protocol    = "-1"
    from_port   = 0
    to_port     = 0
    cidr_blocks = ["0.0.0.0/0"]
  }
}
Initial variable settings (file terraform.tfvars)
region               = "ap-southeast-2"
vpc_cidr_range       = "172.17.0.0/20"
private_subnets_list = ["172.17.0.0/24"]
public_subnets_list  = ["172.17.3.0/24"]
Variables (file variables.tf): variable and default values
variable "region" {
  description = "AWS Region"
  type        = string
}

variable "name" {
  description = "the name of your stack, e.g. \"netbox\""
  type        = string
  default     = "demo"
}

variable "container_port" {
  description = "Port of container"
  type        = number
  default     = 3000
}

variable "container_cpu" {
  description = "The number of cpu units used by the task"
  type        = number
  default     = 1024
}

variable "container_memory" {
  description = "The amount (in MiB) of memory used by the task"
  type        = number
  default     = 2048
}

variable "service_desired_count" {
  description = "Minimum number of services running in parallel"
  type        = string
  default     = 1
}

variable "vpc_cidr_range" {
  type = string
}

variable "private_subnets_list" {
  description = "Private subnet list for infrastructure"
  type        = list(string)
}

variable "public_subnets_list" {
  description = "Public subnet list for infrastructure"
  type        = list(string)
}

variable "app_port" {
  description = "Port exposed by the docker image to redirect traffic to"
  default     = 3000
}

variable "fargate_cpu" {
  description = "Fargate instance CPU units to provision (1 vCPU = 1024 CPU units)"
  default     = "1024"
}

variable "fargate_memory" {
  description = "Fargate instance memory to provision (in MiB)"
  default     = "2048"
}
Networking (file vpc.tf): Network working components
module "demo_ecs_vpc" {
  source  = "terraform-aws-modules/vpc/aws"
  version = "5.8.1"

  name = "${var.name}-vpc"
  cidr = var.vpc_cidr_range

  azs             = ["${var.region}a"]
  private_subnets = var.private_subnets_list
  public_subnets  = var.public_subnets_list


  enable_flow_log                      = true
  create_flow_log_cloudwatch_log_group = true
  create_flow_log_cloudwatch_iam_role  = true
  flow_log_max_aggregation_interval    = 60

  create_igw         = true
  enable_nat_gateway = true
  enable_ipv6        = false

  enable_dns_hostnames = true
  enable_dns_support   = true

}
After you deploy the terraform code, the ECS task will not run until an image is uploaded into the ECR container registry. To tag and upload an image, the following bash script can be used. Remember to update the script with your values for variables: AWS_REGION, REPOSITORY_NAME and IMAGE_NAME.
#!/bin/bash

# Exit immediately if a command exits with a non-zero status
set -e

# Set variables
AWS_REGION="ap-southeast-2"
ACCOUNT_ID=$(aws sts get-caller-identity --query Account --output text)
REPOSITORY_NAME="fargate-demo"
IMAGE_NAME="image-processor-demo"

# Authenticate Docker with ECR
aws ecr get-login-password --region $AWS_REGION | docker login --username AWS --password-stdin $ACCOUNT_ID.dkr.ecr.$AWS_REGION.amazonaws.com

# Build Docker image
docker build -t $IMAGE_NAME .

# Tag Docker image
docker tag $IMAGE_NAME:latest $ACCOUNT_ID.dkr.ecr.$AWS_REGION.amazonaws.com/$REPOSITORY_NAME:latest

# Push Docker image to ECR
docker push $ACCOUNT_ID.dkr.ecr.$AWS_REGION.amazonaws.com/$REPOSITORY_NAME:latest

echo "Docker image successfully pushed to ECR $ACCOUNT_ID.dkr.ecr.$AWS_REGION.amazonaws.com/$REPOSITORY_NAME:latest"
After the Docker image is uploaded to ECR, the ECS Service will change state to ‘Running’. We will need to note the task ID associated with the task based on task definition ‘demo-ecs-task-def’.

To access the shell on the Fargate container we need the command with the following parameters:
aws ecs execute-command \
–cluster <your-cluster-name> \
–task <your-task-id> \
–container <container-name> \
–interactive \
–command “/bin/bash” –region

If you have followed this post, hopefully you will now have a better understanding of AWS Fargate containers and how to access the shell in the container to enable you to debug any potential issues with your setup. In a later post we will use a Fargate container running a python script for some computer vision object detection and tracking. The python script will read messages from a SQS queue; download a video and run an object detection and tracking model. Finally the detections will be annotated into the video and uploaded back to S3 storage.

[…] blog is a continuation of the AWS Fargate 101 blog post (https://devbuildit.com/2024/08/13/aws-fargate-101/). We will install computer vision software onto […]
LikeLike
[…] are written to an AWS CloudWatch Log Group. I strongly recommend reading the previous blog posts on AWS Fargate (https://devbuildit.com/2024/08/13/aws-fargate-101/) and Computer Vision […]
LikeLike