

This blog is a continuation of the “Introduction to machine learning” blog https://devbuildit.com/2024/03/02/machine-learning-introduction/. In this previous blog, we utilised the Amazon prebuilt container (which included the XGBoost algorithm) to solve a regression problem. We used a Sagemaker Jupyter notebook as our platform to train and test our model to solve a simple regression problem.
In this blog, we will utilise Jupyter Notebooks again, but within the Jupyter Labs environment, which presents our notebook in more of an IDE look and feel. Instead of using a pre-built container with an algorithm, we will build our own model architecture using PyTorch. As we progress through the training phase, we will visualise our progress using Matplotlib (see https://devbuildit.com/2023/01/24/basic-plotting-using-aws-jupyter-notebooks/) for a refresher on Matplotlib.
The main AWS components we deploy are:
- VPC ( with outbound-only internet access )
- KMS key
- Sagemaker Notebook
- Sagemaker Notebook IAM role
- S3 bucket (not used directly in this blog, but good practice to load data from S3 in the future.
- Sagemaker Notebook
The Terraform source for the above infrastructure can be found at https://github.com/arinzl/aws-machine-learning-part2.git
We will use a Notebook lifecycle configuration to install the latest version of Pytorch into a Jupyter Notebook. I have chosen to use the non-GPU instance to keep the costs down. The PyTorch install is optimised for a CPU environment. If you wish to use a GPU instance, update the Notebook Lifecycle configuration Terraform resource to install the PyTorch version and matching CUDA capabilities. The Jupyter Notebook can be accessed via the AWS console using a JupyterLabs environment or a standard Jupyter Notebook interface. I believe there is no cost difference between the options.
We have used similar Terraform code in previous blogs to deploy a Sagemaker Notebook. The new code used in the blog is associated with the Notebook Lifecycle configuration as shown below. The code objective is the install:
- Python version 3.10.13
- Create a virtual environment
- Matplotlib
- Pandas
- Numpy
- Pytorch (latest version for a CPU)
- Create a new IPython Kernel “Python 3.10.X (Pytorch)”
resource "aws_sagemaker_notebook_instance_lifecycle_configuration" "pytorch_venv" {
  name = "install-pytorch-venv"
  on_start = base64encode(<<EOF
#!/bin/bash
set -e
LOGFILE="/home/ec2-user/SageMaker/pytorch-install.log"
INSTALL_SCRIPT="/home/ec2-user/SageMaker/setup_pytorch.sh"
SETUP_SCRIPT="/home/ec2-user/SageMaker/setup_python.sh"
VENV_DIR="/home/ec2-user/python-venv"
PYTHON_VERSION="3.10.13"
FLAG_FILE="/home/ec2-user/SageMaker/.python_installed"

# Ensure the SageMaker directory exists and has correct permissions
sudo -u ec2-user mkdir -p /home/ec2-user/SageMaker
sudo chown -R ec2-user:ec2-user /home/ec2-user/SageMaker

# Start with a clean log file owned by ec2-user
sudo -u ec2-user touch "$LOGFILE"
sudo -u ec2-user bash -c "echo \"---- PyTorch Setup Started: $(date) ----\" > \"$LOGFILE\""

# Create the Python installation script that will run in the background
sudo -u ec2-user tee "$SETUP_SCRIPT" > /dev/null << EOF2
#!/bin/bash
LOGFILE="/home/ec2-user/SageMaker/python-install.log"
PYTHON_VERSION="3.10.13"
FLAG_FILE="/home/ec2-user/SageMaker/.python_installed"
VENV_DIR="/home/ec2-user/python-venv"
PYTHON_PATH="/usr/local/bin/python3.10"
echo "[INFO] Starting Python \$PYTHON_VERSION installation..." >> "\$LOGFILE"

# Install development tools and dependencies
sudo yum update -y >> "\$LOGFILE" 2>&1
sudo yum groupinstall -y "Development Tools" >> "\$LOGFILE" 2>&1
sudo yum install -y openssl-devel bzip2-devel libffi-devel zlib-devel readline-devel sqlite-devel >> "\$LOGFILE" 2>&1

# Download and install Python 3.10.13
cd /tmp
echo "[INFO] Downloading Python \$PYTHON_VERSION..." >> "\$LOGFILE"
curl -L -O https://www.python.org/ftp/python/\$PYTHON_VERSION/Python-\$PYTHON_VERSION.tgz >> "\$LOGFILE" 2>&1

# Verify download was successful
if [ ! -f "/tmp/Python-\$PYTHON_VERSION.tgz" ]; then
  echo "[ERROR] Failed to download Python \$PYTHON_VERSION" >> "\$LOGFILE"
  echo "[INFO] Checking what's in the directory:" >> "\$LOGFILE"
  ls -la /tmp >> "\$LOGFILE" 2>&1
  exit 1
fi

echo "[INFO] Extracting Python \$PYTHON_VERSION..." >> "\$LOGFILE"
tar -xzf Python-\$PYTHON_VERSION.tgz >> "\$LOGFILE" 2>&1

# Verify extraction was successful
if [ ! -d "/tmp/Python-\$PYTHON_VERSION" ]; then
  echo "[ERROR] Failed to extract Python \$PYTHON_VERSION" >> "\$LOGFILE"
  echo "[INFO] Checking what's in the directory:" >> "\$LOGFILE"
  ls -la /tmp >> "\$LOGFILE" 2>&1
  exit 1
fi
cd Python-\$PYTHON_VERSION
echo "[INFO] Configuring Python \$PYTHON_VERSION..." >> "\$LOGFILE"
./configure --enable-optimizations --with-ensurepip=install >> "\$LOGFILE" 2>&1
echo "[INFO] Building Python \$PYTHON_VERSION..." >> "\$LOGFILE"
make -j \$(nproc) >> "\$LOGFILE" 2>&1
echo "[INFO] Installing Python \$PYTHON_VERSION..." >> "\$LOGFILE"
sudo make altinstall >> "\$LOGFILE" 2>&1

# Create symlink for easier access
echo "[INFO] Creating symlinks..." >> "\$LOGFILE"
sudo ln -sf /usr/local/bin/python3.10 /usr/bin/python3.10
sudo ln -sf /usr/local/bin/pip3.10 /usr/bin/pip3.10

# Verify Python installation
echo "[INFO] Verifying Python installation:" >> "\$LOGFILE"
which python3.10 >> "\$LOGFILE" 2>&1
python3.10 --version >> "\$LOGFILE" 2>&1
echo "[INFO] Python \$PYTHON_VERSION installed successfully" >> "\$LOGFILE"
# Create venv if it does not exist
if [ -d "\$VENV_DIR" ]; then
  echo "[INFO] Removing existing virtual environment..." >> "\$LOGFILE"
  rm -rf "\$VENV_DIR"
fi
echo "[INFO] Creating new Python \$PYTHON_VERSION virtual environment..." >> "\$LOGFILE"
\$PYTHON_PATH -m venv "\$VENV_DIR" >> "\$LOGFILE" 2>&1

# Verify venv creation
echo "[INFO] Verifying virtual environment:" >> "\$LOGFILE"
ls -la "\$VENV_DIR" >> "\$LOGFILE" 2>&1
ls -la "\$VENV_DIR/bin" >> "\$LOGFILE" 2>&1

# Create flag file to indicate installation is complete
touch "\$FLAG_FILE"
echo "[INFO] Python setup completed at \$(date)" >> "\$LOGFILE"
EOF2

# Create the PyTorch installation script that will check for Python installation
sudo -u ec2-user tee "$INSTALL_SCRIPT" > /dev/null << EOF3
#!/bin/bash
VENV_DIR="/home/ec2-user/python-venv"
LOGFILE="/home/ec2-user/SageMaker/pytorch-install.log"
FLAG_FILE="/home/ec2-user/SageMaker/.python_installed"
KERNEL_NAME="python310-pytorch"
DISPLAY_NAME="Python 3.10.x (PyTorch)"
KERNEL_DIR="\$HOME/.local/share/jupyter/kernels/\$KERNEL_NAME"

# Wait for Python installation to complete (max 30 minutes)
MAX_WAIT=1800
WAITED=0
echo "[INFO] Waiting for Python installation to complete..." >> "\$LOGFILE"
while [ ! -f "\$FLAG_FILE" ] && [ \$WAITED -lt \$MAX_WAIT ]; do
  sleep 10
  WAITED=\$((WAITED + 10))
  echo "[INFO] Still waiting for Python installation... (\$WAITED seconds)" >> "\$LOGFILE"
done
if [ ! -f "\$FLAG_FILE" ]; then
  echo "[ERROR] Python installation timed out after \$WAITED seconds" >> "\$LOGFILE"
  exit 1
fi

# Wait a bit more to ensure file system sync
sleep 5

# Check if venv exists
if [ ! -d "\$VENV_DIR" ] || [ ! -f "\$VENV_DIR/bin/activate" ]; then
  echo "[ERROR] Virtual environment not found or incomplete" >> "\$LOGFILE"
  ls -la "\$VENV_DIR" >> "\$LOGFILE" 2>&1 || echo "VENV_DIR does not exist" >> "\$LOGFILE"
  exit 1
fi

# Use the full path to activate script
echo "[INFO] Activating virtual environment" >> "\$LOGFILE"
source "\$VENV_DIR/bin/activate"

# Verify we're in the virtual environment
which python >> "\$LOGFILE" 2>&1
echo "Python version: \$(python --version)" >> "\$LOGFILE" 2>&1
echo "[INFO] Installing pip packages..." >> "\$LOGFILE"

# Update pip first
"\$VENV_DIR/bin/pip" install --upgrade pip >> "\$LOGFILE" 2>&1
# Install required packages using the full path to pip
"\$VENV_DIR/bin/pip" install wheel setuptools >> "\$LOGFILE" 2>&1
# Install NumPy and Pandas
echo "[INFO] Installing NumPy and Pandas..." >> "\$LOGFILE"
"\$VENV_DIR/bin/pip" install numpy pandas matplotlib >> "\$LOGFILE" 2>&1
# Install PyTorch
echo "[INFO] Installing PyTorch..." >> "\$LOGFILE"
"\$VENV_DIR/bin/pip" install torch --index-url https://download.pytorch.org/whl/cpu >> "\$LOGFILE" 2>&1
# Install Jupyter related packages
echo "[INFO] Installing Jupyter packages..." >> "\$LOGFILE"
"\$VENV_DIR/bin/pip" install ipykernel jupyter_client >> "\$LOGFILE" 2>&1

# Remove any existing kernel with the same name
if [ -d "\$KERNEL_DIR" ]; then
  echo "[INFO] Removing existing kernel directory..." >> "\$LOGFILE"
  rm -rf "\$KERNEL_DIR"
fi

# Create kernel directory
mkdir -p "\$KERNEL_DIR"

# Create kernel.json file manually
cat > "\$KERNEL_DIR/kernel.json" << EOK
{
 "argv": [
  "\$VENV_DIR/bin/python",
  "-m",
  "ipykernel_launcher",
  "-f",
  "{connection_file}"
 ],
 "display_name": "\$DISPLAY_NAME",
 "language": "python",
 "metadata": {
  "debugger": true
 }
}
EOK

echo "[INFO] Created custom kernel.json:" >> "\$LOGFILE"
cat "\$KERNEL_DIR/kernel.json" >> "\$LOGFILE"

# Verify package installations with simple version checks
echo "[INFO] Verifying package installations:" >> "\$LOGFILE"
echo "Python version:" >> "\$LOGFILE"
"\$VENV_DIR/bin/python" --version >> "\$LOGFILE" 2>&1

echo "NumPy version:" >> "\$LOGFILE"
"\$VENV_DIR/bin/python" -c 'import numpy; print(numpy.__version__)' >> "\$LOGFILE" 2>&1

echo "Pandas version:" >> "\$LOGFILE"
"\$VENV_DIR/bin/python" -c 'import pandas; print(pandas.__version__)' >> "\$LOGFILE" 2>&1

echo "PyTorch version:" >> "\$LOGFILE"
"\$VENV_DIR/bin/python" -c 'import torch; print(torch.__version__)' >> "\$LOGFILE" 2>&1

echo "---- PyTorch Install Completed: \$(date) ----" >> "\$LOGFILE"
EOF3

# Make scripts executable
sudo -u ec2-user chmod +x "$SETUP_SCRIPT"
sudo -u ec2-user chmod +x "$INSTALL_SCRIPT"

# Check if Python is already installed
if [ -f "$FLAG_FILE" ] && command -v python3.10 &> /dev/null; then
  sudo -u ec2-user bash -c "echo \"[INFO] Python 3.10 is already installed, skipping installation\" >> \"$LOGFILE\""
else
  # Start Python installation in the background
  sudo -u ec2-user bash -c "echo \"[INFO] Starting Python installation in the background\" >> \"$LOGFILE\""
  sudo -u ec2-user nohup bash "$SETUP_SCRIPT" >> "$LOGFILE" 2>&1 &
fi

# Start PyTorch installation in the background
sudo -u ec2-user bash -c "echo \"[INFO] Scheduling PyTorch installation\" >> \"$LOGFILE\""
sudo -u ec2-user nohup bash "$INSTALL_SCRIPT" >> "$LOGFILE" 2>&1 &

# Exit successfully to allow the notebook to start
echo "[INFO] Lifecycle configuration script completed, notebook will start while installation continues in background" >> "$LOGFILE"
exit 0
EOF
  )
}
Note: the AWS Notebook Lifecycle timeout is 5 minutes. Installing Python and PyTorch can be a lengthy process and often exceeds 5 minutes on low-spec hardware. To overcome this restriction, I have set the deployment to run the two installation scripts in the background. The first script installs Python 3.10.13; the second script installs the remaining components: Matplotlib, Numpy, Pandas, and PyTorch. Both scripts create log files to assist with debugging any deployment issues. The scripts take approximately 20 minutes to complete. In future blogs, we will build models using Docker containers, which will speed up the process.
Once the Terraform code is deployed and you have waited 20 minutes for the installation scripts to complete, access the AWS console and search for the service “SageMaker AI”. On the left-hand side menu under “Applications and IDEs”, select “Notebook”. You should see a screen showing your notebook as “InService”, and you will have the option to start a notebook instance or start the notebook instance within a JupyterLab environment. There is no additional charge for using a JupyterLab environment.

Click on “Open JupyterLab”
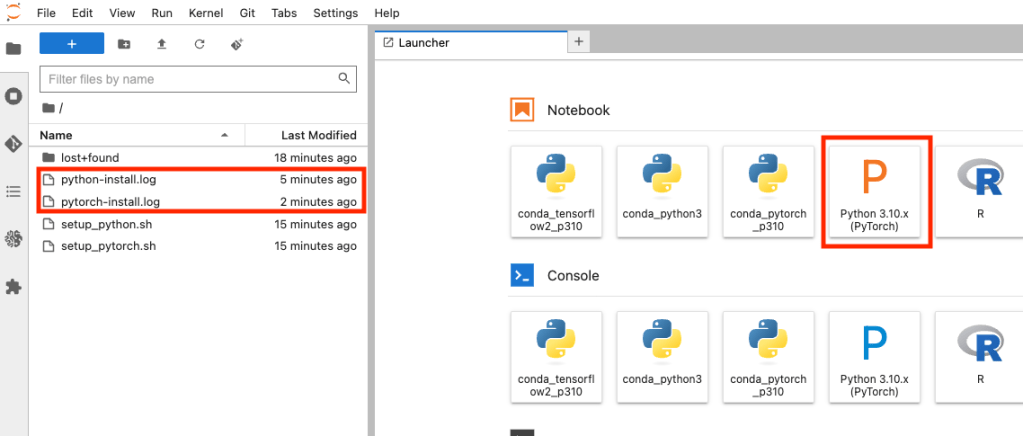
Once inside the JupyterLab environment, you will notice the two log files and the ‘Python 3.10.X (PyTorch)’ kernel. Click on the “Python 3.10.X (PyTorch)” icon to start a new session using this IPython kernel.
In the next blog, I will walk you through the AWS SageMaker Notebook. We will generate some data and train a model. Using our model, we will make predictions and visualise how good or bad our model predictions are.
